How to Wash a Wedding Dress at Home
soaking
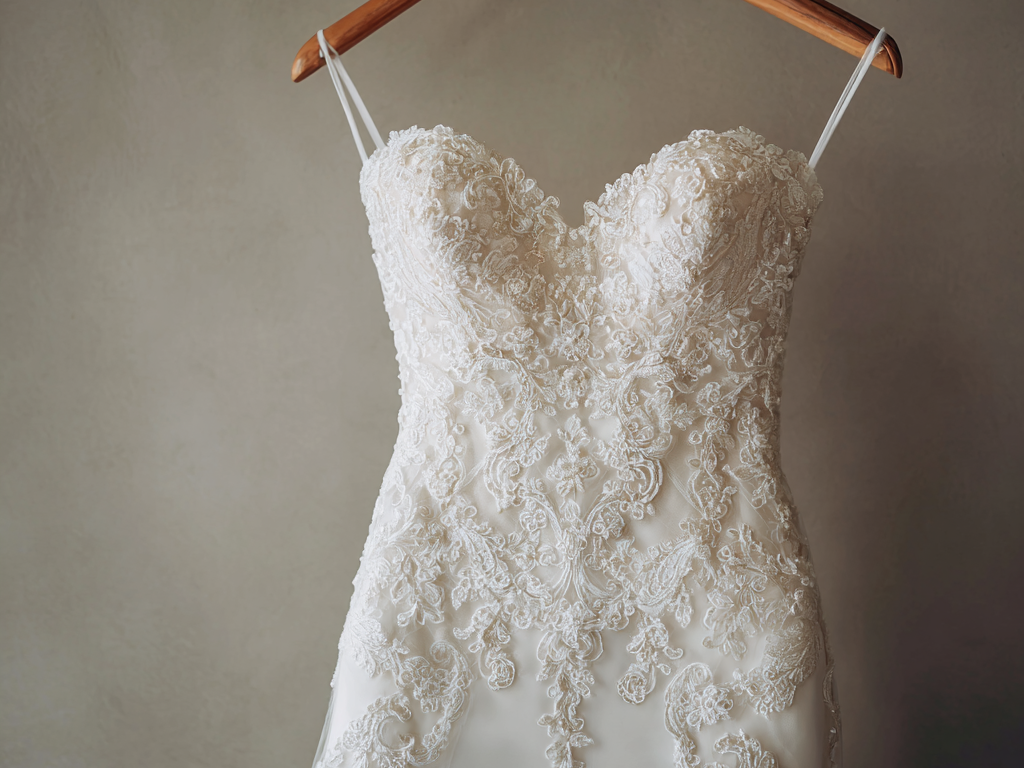
The idea of washing a wedding dress at home makes most people nervous. It's likely the most expensive single garment you've ever owned, it carries enormous sentimental value, and one wrong move feels irreversible.
But professional wedding dress cleaning costs $200 to $600 or more, and many brides are surprised to learn that a careful home cleaning is not only possible but often gentler than what a standard dry cleaner does. The key is understanding your dress's fabric, taking your time, and following a methodical process.
Before You Start: Assess Your Dress
Not every wedding dress can or should be cleaned at home. Take an honest look at yours.
Home cleaning is appropriate for dresses that are:
- Made from a single, relatively simple fabric (polyester, nylon, simple lace over a lining)
- Unstructured or lightly structured (no heavy boning, no internal corsetry that might distort)
- Not heavily beaded or embellished (individual beads can loosen, fall off, or discolor in water)
- Stained primarily at the hem (dirt, grass) or under the arms (sweat, deodorant)
Consider professional cleaning if your dress has:
- Heavy beading, sequins, or crystal embellishment (adhesives can dissolve in water)
- Silk satin or silk organza fabric (these are extremely sensitive to water spots)
- Complex internal structure (boned corsets, multiple layers of interfacing)
- Antique or heirloom value (the emotional stakes are too high for experimentation)
- Mystery stains you can't identify (a professional can match the treatment to the stain)
If you're unsure, check the care label. If the dress has one that says the fabric is washable, you have a green light to proceed carefully.
What You'll Need
- A clean bathtub (this is the only vessel large enough for most wedding dresses)
- Mild, clear liquid detergent (like Soak Wash, Eucalan, or a gentle baby shampoo)
- OxiClean or oxygen bleach (for stubborn stains on white fabrics)
- White vinegar (for deodorant stains)
- Clean white towels (at least four large ones)
- A garment steamer (for finishing)
- Patience. This process takes several hours, including drying time.
Step One: Spot Treat First
Before submerging the dress, address specific stains individually.
Hem dirt and grass: Make a paste of OxiClean and warm water. Apply it to the stained areas with a soft brush or your fingers. Let it sit for 20 to 30 minutes.
Underarm deodorant stains: Apply white vinegar directly to the stain. Let it sit for 15 minutes. Then apply a small amount of dish soap and work it in gently.
Makeup on the bodice or neckline: Use micellar water on a cotton pad. Gently dab at the foundation or lipstick marks. Micellar water is designed to dissolve makeup without harsh scrubbing.
Red wine or food stains: Apply OxiClean paste and let it sit for 30 minutes before soaking.
Step Two: The Soak
- Clean your bathtub thoroughly. Any residue from bath products can transfer to the dress.
- Fill the tub with cool to lukewarm water (never hot). Add a small amount of mild detergent, about one to two tablespoons. The water should feel barely soapy. If using OxiClean, add a scoop to the water and let it dissolve.
- Gently lower the dress into the water. Don't bunch or wad it. Let it spread out naturally. Push it under the water gently so the entire dress is submerged.
- Let it soak for one to two hours. You can gently agitate the water by swishing your hands through it every 20 minutes, but don't scrub or wring the dress.
- Check the hem and any pre-treated stain areas. If stains are still visible, gently work a bit more detergent into those spots with your fingertips while the dress is still in the water.
- Drain the tub. Do not lift the dress out while the tub is full. A wet wedding dress is extremely heavy, and lifting it can stretch seams, tear delicate fabric, or pull off embellishments.
- Refill the tub with cool, clean water for rinsing. Let the dress soak in the rinse water for 10 minutes. Drain again. Repeat this rinse until the water is completely clear and free of soap.
Step Three: Drying
This is the most critical step and requires the most patience.
- With the tub drained, gently press the fabric against the bottom of the tub to push out excess water. Do not wring, twist, or squeeze.
- Lay a clean white towel on a flat surface next to the tub (or drape it over the tub edge). Carefully lift sections of the dress and place them on the towel. Roll the towel around the fabric to absorb water. Repeat with fresh towels.
- For the skirt: If the dress has a full skirt, you may need to drape it over a drying rack or a clean shower curtain rod. Spread the fabric to avoid overlapping wet layers, which can cause watermarks or mildew.
- For the bodice: Lay the bodice flat on a clean white towel, shaping it gently back to its original form. If the bodice has structure (boning, cups), reshape while damp.
- Allow the dress to air dry completely. This can take 24 to 48 hours, depending on the fabric and the humidity in your home. Keep it away from direct sunlight, heat sources, and colored surfaces (a colored towel or bedspread can transfer dye to a wet white dress).
- Do not use a dryer, a hair dryer, or a fan pointing directly at the dress. Natural air drying is the only safe method.
Step Four: Finishing
Once the dress is completely dry:
Steam out any wrinkles. Use a garment steamer on a low setting, held a few inches from the fabric. Start from the bottom (the skirt hem) and work up. For delicate fabrics like tulle and organza, hold the steamer farther away and use short bursts.
Do not iron a wedding dress unless you're very experienced with the specific fabric. The risk of scorching, shine marks, or melting synthetic fabrics is too high.
Inspect the dress carefully. Check all seams, hems, and embellishment attachment points. If anything has loosened during the wash, a few hand stitches can secure it.
Preservation After Cleaning
If you plan to store the dress long-term (for sentimental reasons, for a future daughter, or for resale), proper preservation is essential.
Use an acid-free box and acid-free tissue paper. Standard cardboard and tissue paper contain acids that will yellow white fabric over time. Preservation kits with acid-free materials are available online for $30 to $50.
Stuff the bodice and sleeves with acid-free tissue to help the dress hold its shape.
Fold gently with tissue between the folds to prevent sharp creases from forming. Re-fold the dress every year or two to prevent permanent crease lines.
Store in a cool, dry, dark place. Attics (too hot), basements (too damp), and garages (temperature fluctuations) are all poor choices. A bedroom closet shelf is ideal.
Do not seal the box with tape. The dress needs minimal air circulation to prevent mildew. Close the box but don't make it airtight.
Do not store in a plastic garment bag. Plastic traps moisture and prevents the fabric from breathing. Over years, this can cause yellowing and mildew.
Quick Reference
| Step | What | Time |
|---|---|---|
| Spot treat | Address specific stains before soaking | 20-30 min |
| Soak | Cool water + mild detergent in bathtub | 1-2 hours |
| Rinse | Clean water, repeat until clear | 20-30 min |
| Dry | Press water out, towel roll, air dry flat | 24-48 hours |
| Finish | Steam wrinkles, inspect seams | 30-60 min |
| Preserve | Acid-free box and tissue, cool dark storage | Ongoing |
Cleaning a wedding dress at home is an act of care in the truest sense. It takes time, gentleness, and attention. But there's something meaningful about personally tending to a garment that marked one of the most important days of your life. Take your time, trust the process, and the dress will come through beautifully.
Like these stories? You will (probably) love our monthly newsletter.
Member discussion